
This AB Testing Guide is made for intermediate testers, it doesn’t claim to explain AB Testing from scratch. The overall purpose is to get some things straight about testing.
1) Before the test
Before starting a test you have to keep the following things in mind:
-
- Always have your underlying hypothesis ready, otherwise, your test will be worthless Why do we need a solid hypothesis? – Because we want to deduct proven concepts from the test, which we can apply to other scenarios. A Hypothesis could be something like: “We think that larger buy buttons convert better than smaller ones because the call to action is more prominent on the site”
- Your personal opinion doesn’t matter and should never affect the test findings. We cannot stress that enough – we have seen it dozen of times: people have their favorite candidate and like in sports they want it to win. A hypothesis also helps here to prevent this bias, since you clearly state what you expect to happen and if it doesn’t, you cannot fool anyone with your personal opinion.
- Design your test in regards to the expected uplift, in other words, make sure your changes will actually have an impact on your Conversion Rate (CR). Some industry reports go even further by saying: “Always keep in mind that you are a business and ‘up’ is the way you want to go – to put together design changes that most probably have a detectable effect on your Conversion Rate.” Therefore, think about the uplift beforehand, because it will have an impact on the required sample size and thereby your test duration. The table below illustrates the relationship between those variables. First, you have to check your average Conversion Rate of the default candidate A, then think about the expected uplift which you forecast due to the improvement of your new candidate B and then the table below will tell you the required sample size (number of sessions per candidate) you will need to prove that.
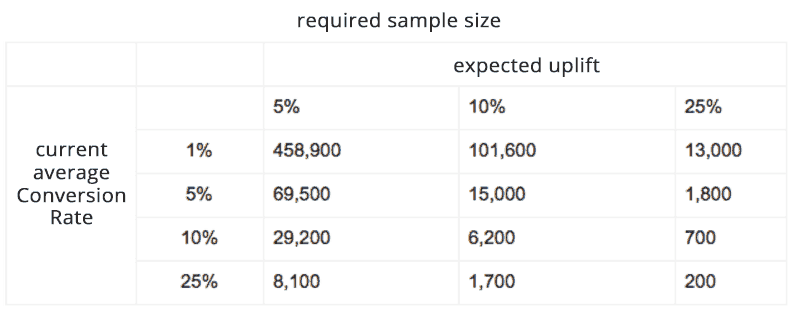
As you see the minimum expected uplift should be at least 5% otherwise your required sample size will be too big. As mentioned above, you are a business and don’t necessarily want to wait for ages to get valid results. The other limiting factor in this 2-by-2 matrix is the average conversion rate (aka baseline CR).
The normal case is that the further down the conversion funnel you get, the higher is the Conversion Rate, wherefore the fewer sessions you will need to get valid results. So the Landing Page has normally a low conversion rate, so you need more traffic and on the other hand, a checkout page has a high conversion rate so you will need fewer sessions.
You can also check out the sample size calculator of Optimizely and find out the required sample size before starting your test.
2) During the test
Keep calm, don’t get too excited early on. Relax! Just look into the results to make sure that nothing goes absolutely wrong. Our current best practice is to wait for at least one business cycle (a full week) before looking at the trends more closely. However, a duration of a test always depends on the traffic, the baseline conversion and how drastic a change is. Some business might just need an afternoon of testing, but then your name is probably amazon and your traffic is insane and probably you have your own AB Testing Guide.
3) After the test
The Last step of our AB Testing Guide explains the common measures. The test is usually over once you reached the preassigned confidence level and recommended sample size or whenever you have decided to stop the test for whatever reason, maybe because you couldn’t reach any confidence level at all, which would mean that your changes have been to minor and not detectable, so it didn’t make a difference to your customers.
Let’s say you have reached the required confidence level. What does the result tell you?
Uplift:
The uplift sometimes referred to improvement, is the increase in your Conversion Rate of your Challenger (Candidate B) compared to your current Champion (Candidate A). It can also be of negative value, which simply means your Challenger lost.
Confidence level:
The confidence level is a bit tricky, wherefore this AB Testing Guide briefly explains the essentials. For those of you who want to dive into it more deeply, the next chapter is going to explain it more precisely: Statistics of AB Testing
The confidence level also referred to as significance level, indicates the probability that your findings are correct. Best explained by the following two examples:
- Let’s say you observe a 10% uplift for candidate B on a 95% confidence level, this means you can be 95% certain that your hypothesis is correct. Only in 5% of all times, you would deduce incorrectly that B is better than A, even though in reality A is actually better. (so-called Type I error)
- Let’s say you observe a 12% uplift for B only on a 70% confidence level, this means you don’t have any significant result since the chance are 30% that you are actually wrong and B is not better than A.
As you might have guessed it, you have to agree on a confidence level beforehand. In other words, what risk are you willing to take that you might be wrong. Usually you should test with a 95% confidence level, however, in more critical studies like in medicine, you would agree on 99%, to be absolutely certain. This is up to you, however, we suggest to test at least at a 90% confidence level, everything else would be gambling.
Rule of thumb: the higher your the confidence level, the longer your test duration, the higher your costs. Keep in mind you are a business, not a University or a Pharmaceutical Company with unlimited resources.
Validity:
Simply by reaching a confidence level your test isn’t done yet, you also have to have a close look at your Validity. The confidence level still doesn’t mean you can be certain that candidate B won. For example, it might be the case that you reached a confidence level within 1 day due to high traffic and a significant difference between your candidates, but then you only snapped a day out of 7 days a week. The basic rule to keep in mind: you always want to include enough of your user base to have a representing sample.
So to cover a certain validity, make sure:
- your test includes full business cycle because you need to capture as much representative sample/people of your average user population as possible. For example, when you run your test on Monday till Thursday you are missing out all folks who buy mostly on weekends, in other words working people with money!
- test full weeks at a time, when you start Monday morning then end it Monday morning. (If you work Monday till Friday, it is good advice not to start a test on Fridays in case something goes wrong.)
- don’t test only during special selling seasons, like Black Friday or Christmas, except you want to test promotions.
- make sure you have at least 250-400 unique converters/ orders/ clicks, whatever your measure is in your test setup.
- have a closer look at the different segments of your users, look at different countries, regions, devices, etc. you will learn a lot from this data about different user behaviors.
It also helps to look at the absolute numbers, i.e. if the absolute difference between the winner and the loser candidate is just 10 orders, then it could be easily a coincidence.
We hope you liked this AB Testing Guide and as always if you have any suggestions leave a comment below. To understand AB Testing to the fullest go ahead and read our Statistics of AB Testing section.
Become a better marketer through A/B Testing.
Get interesting stuff to your inbox - A/B Test Ideas, proven UX concepts and new tools.


Whoa! This is impressive. I’m just sitting here pondering everything you said. Really cool.